by Dirt Simple
Here is is, next to the 1st day of Spring, and I'm desperately still searching for evergreens that like (or don't mind) containers for Zone 8. It's not looking good, I'm afraid I'll have to re-do the garden each year after all. Maybe it's just the rainy storm getting my mood settled into pessimistic. Time will tell.
I started re-doing the front yard edges yesterday in the cool 50 degree temperatures and that lead me to remember I really don't like re-doing plantings. There must be a way to have and keep evergreens here.
Scents of Clematis
Clematis, Golden - Clematis tangutica
They smell like coconut... and they're $12 cheaper than at the local store. I'm definitely ordering these so sharing my excitement!
I had seen some clematis in the local store's gardening center and was astonished they were asking $19.95 a piece! Granted, they were about 2' tall already, but there's no way in the world I'd pay $20 for a plant that may or may not survive where I plant it. That lead me to searching online & finding this most wonderful option.
So Many Worms!
I saw so many worms in the dirt where the beans grew last year. I wasn't sure if it was a problem or not - there were about 3 worms for every scoop of dirt. So then I searched & found this and sharing just in case you find an extraordinary number of worms in your dirt, too. People have started worm bins, too, in case you want more worms than you already have.
Spring Seeds
Last year was my first try ever at growing veggies outside. While I had a few big wins, there were some harsh losses, too. Like the broccoli that was eaten to disfigurement by bugs, the cucumbers that grew to be edible yet refused to flourish, the corn that grew about 8" high and stopped dead in its tracks. I went in head first knowing that I didn't know what I was doing! I figured if 50% of the plants lived that'd be great. And I was about right with that 50% guess.
I think the ants ate many corn seeds, I'm sure the cucumbers were ransacked by squirrels, oh and the poor broccoli - the countless bugs of some type I still don't know - it was hardly even recognizable by the time the cauliflower planted right next to it was beautifully ready to pick. The squirrels got the strawberries, though the bugs didn't, and the beans, well, the pole beans made it, the bush beans didn't. The carrots did beautifully but I planted them too late (and still the slugs really tried to eat the tops off). The lettuce suffered from slugs, too. It was a really big fat learning experience it was.
This year, is going to be different, very different. Because this year, I know about companion planting- which simply means planting things together that help each other in some way. Mints discourage ants, tarragon helps just about everything it's planted by flourish, borage repels many pests that attack veggies, nasturtiums repel aphids, cabbage looper, squash bug, white fly, and cucumber beetles! So I did some seed shopping on Amazon for flowers that will protect my precious veggies later in the summer.
Sharing the latest seed purchases for this Spring:
Yes, some are "weeds" but they're supposed to be "good" weeds! They don't discourage squirrels, unfortunately, but I do have chicken wire for that.
I think the ants ate many corn seeds, I'm sure the cucumbers were ransacked by squirrels, oh and the poor broccoli - the countless bugs of some type I still don't know - it was hardly even recognizable by the time the cauliflower planted right next to it was beautifully ready to pick. The squirrels got the strawberries, though the bugs didn't, and the beans, well, the pole beans made it, the bush beans didn't. The carrots did beautifully but I planted them too late (and still the slugs really tried to eat the tops off). The lettuce suffered from slugs, too. It was a really big fat learning experience it was.
This year, is going to be different, very different. Because this year, I know about companion planting- which simply means planting things together that help each other in some way. Mints discourage ants, tarragon helps just about everything it's planted by flourish, borage repels many pests that attack veggies, nasturtiums repel aphids, cabbage looper, squash bug, white fly, and cucumber beetles! So I did some seed shopping on Amazon for flowers that will protect my precious veggies later in the summer.
Sharing the latest seed purchases for this Spring:
- 500 Calendula "Mixed" (Calendula officinalis) Seeds
- 200 Stinging Nettle (Urtica dioica) Seeds
- 100 Borage Herb (Borago Officinalis) Seeds
- 1,000 Creeping Thyme "Mother of Thyme" (Thymus serpyllum) Seeds
- 200 Wild Bee Balm (Monarda fistulosa) Seeds
- 100 Lavender "Italian" (Lavandula angustifolia) Seeds
- 70 Nasturtium "Jewel Mixture" (Tropaeolum majus) Seeds
- 200 Aster "Ostrich Feather" (Callistephus chinensis) Seeds
- 350 Russian Tarragon Seeds
- 200 Pennyroyal Mint (Mentha pulegium) Seeds
Yes, some are "weeds" but they're supposed to be "good" weeds! They don't discourage squirrels, unfortunately, but I do have chicken wire for that.
Radishes Over Winter
Today I found this in one of the smallest raised garden bed containers I made at the end of summer last year. The seeds for these radishes were planted mid-to-late fall. We've had freezing temps, snow, and ice, but these made it all winter - though they're awfully small they don't take much room to grow and I did nothing but water them for the 1st few weeks they were planted. After that the fall rains came and nature took care of the rest. I didn't even do anything to protect them from the cold. Maybe the radishes would be bigger if I did, I'm just not sure. At this point I'm happy I got to them before the squirrels got hungry enough to eat them.

I had lost a lot to slugs I didn't get off as quickly as I could have, darn things do eat leaves so quickly! Next time I'm going to sprinkle crushed up egg shells along the perimeter of the planter boxes. Rumor has it slugs don't like the sharp egg shell edges, so it's worth a shot. I'd rather torture them with shells than tempt them with beer. Why should I open a bar for them, nasty things they are! Squirrels are bold little creatures, too! Just look at those darn teeth marks!

I had lost a lot to slugs I didn't get off as quickly as I could have, darn things do eat leaves so quickly! Next time I'm going to sprinkle crushed up egg shells along the perimeter of the planter boxes. Rumor has it slugs don't like the sharp egg shell edges, so it's worth a shot. I'd rather torture them with shells than tempt them with beer. Why should I open a bar for them, nasty things they are! Squirrels are bold little creatures, too! Just look at those darn teeth marks!
Organic Compost -Yes!
I was reading today about farmers' soil in this Food and Extreme Weather: It's the Soil, Stupid article. The differences between the 2 types of dirt - dirt vs soil - in the picture is obvious even without knowing much.
I live in a very tiny house, with a yard that's sadly small, but I do try to grow pretty flowers, tomatoes and strawberries successfully. A couple of years ago I bought dirt (called soil) - yes, paid money for dirt. But it's GOOD dirt: a mix of compost and topsoil. The dirt that came with the house sucks. Really. It's full of rocks and clay, so I had to buy dirt (oops, soil) to have something for roots to be happy growing in.
One problem I have is a huge shortage of money and dreams bigger than the days of summer, so buying more good dirt every time I want to grow more is simply not an option. So why not "make" good dirt (actual garden soil)? Enter the search for compost, is it worth it? How do I do it? and last but not least, how long does it take? It's not actually called dirt though, it's soil. Yet another word difference I need to remember is important.
With all the pages, stories, and guides online I like this one the most. So next I have to pick a spot and get going! Ugh... waiting for winter to end can be so frustrating! It's awfully cold to be working outside still. So planning is all I can do for now. Will update with pics as soon as the thermometer goes up a bit :)
Oh, and by the way, there's a big difference not only between dirt & soil, but also differences between potting soil and potting mix.
Inspiration from Rosemary Verey
Sometimes plans change. Priorities change. That happened to me yet again this week. With the days getting longer, and the break in the Winter weather, my lovely neighbors took it upon themselves to build a carport this last weekend. I understand the near need for one for their children to have a dryer place to play outside during the long rainy seasons here, however, I'm utterly disappointed. The shear ugliness of it instantly sent me in to depression. Instead of the clear view I had over the fence seeing their house in the distance and majestic pine trees nearby, I now see the edge of carport lumber with metal and plastic ridged sheeting nailed haphazardly as a light substitute for a roof. I've lost the feeling of distance between yards & lost open space, and am now faced with glaring construction only a few feet away from and over the top of the fence line. Encroached upon, that's how I feel, even though it's certainly their right to build such a thing, I'm still negatively affected. So I did as usual for me: I panicked, felt anger then guilt for feeling angry, then started searching for solutions.
After all the work done last year, right up until the Fall rains began, I had finally achieved a good-looking and functional side yard. Countless bricks laid in my own unique pattern, 2 sitting chairs flanking my huge family room window, 2 nicely sized cedar planter boxes I had carefully built and placed just-so. I even arranged planters perfectly around the front door section inviting visitors to stop and smell the flowers, sit and chat a while, and just for me to sit and enjoy the cool evening breezes during summer. I thought I had perfectly utilized the 7' x 25' fenced area between the short fence at the front of the house and the 6' fence leading to my private back garden. Now I must think vertically, with only a 7' width to use to hide the edge of the new carport, 1' over the 6' fence. If I could make the fence taller - that would be the quick and easy way, I would - but a 6' height is the legal maximum, so now I have a new vertical gardening adventure.
I started by double-checking my measurements, and sneaking right up to and over the fence line with a measuring tape to find out exactly how high I need for new plants such as bushes, vines, or miniature trees to grow. A foot over the 6' fence would probably suffice, but 18" over would surely do the trick. Using Google's image search for hours upon hours I looked out & bookmarked dozens of vines growing on trellises, arbors with crosspieces to hang plants from, evergreens that don't grow too wide, endless styles of lattice - all focusing on tall and narrow.
Then realizing that I don't have to just plant right next to the fence, I braved the cool weather to pound some galvanized nails into the eaves on the west side of my house which now faces this new carport. I then quickly hung 7 plastic planters of various sizes in a random fashion, imagining all the types of flowering plants I will enjoy seeing trailing over the edges in a few months time. For now they're mostly empty, with only a few having some "good" dirt in them, waiting for something, anything to be planted. Fuchsias are my most favorite hanging plant, though they're not available just yet, and I may not fill all the pots with the same thing, I can imagine them in full bloom providing a beautiful view looking out from the biggest window in my house blocking the neighbors creation. Of course this won't make the view to the west any nicer while standing or sitting outside, it will help with blocking the unsightly construction from view when I open the curtains inside the family room.
The the last couple of weeks have held quite a few Spring like days, though we're still in mid-Winter. The thought of another month or more of Winter weather didn't dawn on me until I checked the weather forecast earlier this evening. Right at the very top of the forecast page was an alert for a storm coming this Friday, with snow down to the 1000' elevation. Usually this would be a frustrating reminder that I've got to wait at least another month before beginning planting outside, but this year, it's a silver lining. I can view it as an extra month or so to get together a plan of action for this side yard while I wait for veggie planting time in the backyard. (I'm still emotional about having to spend more time right off on this side yard instead of jumping right into the backyard, but like I said, my priorities have changed - I'm so not willing to stare at the edge of that carport any more days than absolutely necessary.)
Planting for small spaces is a much discussed topic online and in books, too. There are some dedicated to the subject, by many publishers. I have a few of those books by Better Homes & Gardens and the like, but I rather enjoy the pictures more than the words, so Google image search makes me happiest. I ended up searching English gardens for ideas, clicked on an image link - and another and another - and ended up spending much time reading an interesting article called Lessons From A Legendary Gardener. Now this is definitely not an article about small space gardening or even vertical garden planning, but it was entertaining and did give me some good direction about planning a Winter garden. Rosemary Verey loves her garden in the winter, I watched the video thinking she'd be a little ol' crazy lady but she wasn't! She honestly did have a true appreciation of plants, trees & bushes in cold & snowy circumstances. Hmm, odd, but not crazy!
Here in the Northwest, Summer is the shortest season of them all, followed and preceded by the rainy season which usually has a snow season tucked somewhere in the middle. That's how I look at it: Summer season & Rain season. I live in a wetland surrounded my rainforests - not technically, no, but figuratively yes. Why then should I focus on annual Spring or Fall flowers? It just makes sense to plan first and foremost for cold & wet. 3 months of a nice garden with 9 months of sad, or 9 months of nice with 3 months of fantastic! Rosemary Verey said she liked to focus on the evergreens in gardens first, so that's exactly what I'm going to try. Why plant pretty things to hide that hideous carport in the Summer season but then be forced to view it during the other 9 months of the year? Yay! I have gone from desperate idea gathering to at least 1 good idea. Thank you Ms. Verey. :)
Re-growing Celery test
One day not too long ago I tripped over a youtube video on how to regrow celery. So this Thanksgiving I saved the very bottom of the celery stalks that I diced for stuffing. I followed the general directions shared by all the youtube videos of soaking the very bottom of the original celery stalks for days in water. I think I remembered to change the water each day. After the little new baby celery stalks started growing -regrowing celery- I stuck the same bottom of the original celery stalk into wet dirt. Simple... and it's not dead yet! You can see the fresh celery stalks growing in the middle. The old cut-off celery stalks are a bit dried out, but I'm not sure yet if I should remove them or not. So far so good so sharing the story & the photo of the little celery plant that will hopefully regrow itself before I make stuffing again :)

Here's the update picture on how much (or little) the celery grew in 4 days.
Here's some video how-to-do for trying this yourself!
- http://www.youtube.com/watch?v=H-CfJVidG7o - Regrowing Celery
- FoodStorageCooking.com - Regrowing Celery
- How To Regrow Celery - Can You Really Regrow Celery?
- How To Regrow Celery - The Celery Regrew Roots!
Here's the update picture on how much (or little) the celery grew in 4 days.
Broccoli seeds sprouting
I got a nice surprise this afternoon when I was checking the pots to see if any seeds were drying out. Cute little broccoli sprouts pushing up through the top dirt. I didn't think that broccoli seeds would sprout so quickly though I'm so happy they did.
As with the other seeds I planted the plastic cover has to be left off now that the sprouts are showing. I am also stacking some scraps of cardboard under the pot to ensure the sprouts are only about 2-3 inches away from the light. I am doing it this way in hopes that the sprouts won't get leggy.

As with the other seeds I planted the plastic cover has to be left off now that the sprouts are showing. I am also stacking some scraps of cardboard under the pot to ensure the sprouts are only about 2-3 inches away from the light. I am doing it this way in hopes that the sprouts won't get leggy.
Updated: How quickly they grew in only 8 days!
Remembering Last Spring's Mistakes
Last year when I was just getting started with seedlings on indoor plant shelves I made a lot of mistakes. I'm sure I'm not done making them, but I'm trying to avoid repeating the same ones. Other than the cat eating the tops off the new baby plants, I had problems with all these issues:
Then I over-corrected and stopped watering them in the morning & at night, (yeah, I was that bad), and so I started only watering them every other day. (sighs) Please note: Baby lettuce will die if it dries out. So will every other baby seedling plant. Here's some good basic information I keep handy: http://www.vegetablegardener.com/item/10508/watering-your-seedlings
Once I got decent little 2" plants growing, I was happy. Then I found out tall little seedlings aren't actually healthy, they just haven't fallen over & died yet. Leggy is bad! It's usually caused by... bad lighting. The little guys are stretching up to the light, fighting to survive, and I was unaware. Having the right lighting & distances between the seedlings and the light is vital. I'll probably mess this up again, but this time when I built shelves, I made them adjustable :) I'll have to make another post about that.
My little indoor plants were getting very poor air circulation. It was an effort to save them, basically I protected them to death. The house cat was sneaking onto the plant shelves & eating the tops off the growing veggies. I was so frustrated with the cat (once I figured out is was the cat snacking & not some invisible bug eating plants) that I stuck all the plants into a very small area in a very small room with the door shut. The window in that room is rarely opened. The plants were suffering. They're supposed to get breezes, fresh air, not stuffy still room air.
The evil fungus gnats I nearly forgot to mention. They love moist dirt. They kill baby plants. They are pure evil and put me through hell for 2 weeks. I absolutely suggest learning about them here. http://www.ext.colostate.edu/pubs/insect/05584.html.
Last but not least, by the time I made it through the first learning curves, I had way too many seedlings for the very limited pots that I did have. The weather was not cooperating enough to transplant directly into the garden, and I started a quest to find as many free pots on craigslist.org as possible. Apparently so did everyone else in the county, so I had to get very creative with making temporary "pots". From yogurt containers, to plastic food containers, milk jugs, plastic lined cardboard, and plastic drinking cups. It was frustrating as heck trying to save the plants that actually made it so far, while waiting for the cold weather outside to go away already!
- Over watering (soaked roots to death)
- Under watering (letting things dry out = dead)
- Leggy seedlings (which just fell over dead either from over-watering or under-watering)
- Wrong lighting!
- Very poor air circulation
- Fungus gnats
- Transplanting too late
Then I over-corrected and stopped watering them in the morning & at night, (yeah, I was that bad), and so I started only watering them every other day. (sighs) Please note: Baby lettuce will die if it dries out. So will every other baby seedling plant. Here's some good basic information I keep handy: http://www.vegetablegardener.com/item/10508/watering-your-seedlings
Once I got decent little 2" plants growing, I was happy. Then I found out tall little seedlings aren't actually healthy, they just haven't fallen over & died yet. Leggy is bad! It's usually caused by... bad lighting. The little guys are stretching up to the light, fighting to survive, and I was unaware. Having the right lighting & distances between the seedlings and the light is vital. I'll probably mess this up again, but this time when I built shelves, I made them adjustable :) I'll have to make another post about that.
My little indoor plants were getting very poor air circulation. It was an effort to save them, basically I protected them to death. The house cat was sneaking onto the plant shelves & eating the tops off the growing veggies. I was so frustrated with the cat (once I figured out is was the cat snacking & not some invisible bug eating plants) that I stuck all the plants into a very small area in a very small room with the door shut. The window in that room is rarely opened. The plants were suffering. They're supposed to get breezes, fresh air, not stuffy still room air.
The evil fungus gnats I nearly forgot to mention. They love moist dirt. They kill baby plants. They are pure evil and put me through hell for 2 weeks. I absolutely suggest learning about them here. http://www.ext.colostate.edu/pubs/insect/05584.html.
Last but not least, by the time I made it through the first learning curves, I had way too many seedlings for the very limited pots that I did have. The weather was not cooperating enough to transplant directly into the garden, and I started a quest to find as many free pots on craigslist.org as possible. Apparently so did everyone else in the county, so I had to get very creative with making temporary "pots". From yogurt containers, to plastic food containers, milk jugs, plastic lined cardboard, and plastic drinking cups. It was frustrating as heck trying to save the plants that actually made it so far, while waiting for the cold weather outside to go away already!
Daily progress planning
Today I planted some oregano seeds and some garlic cloves. That's 2 more pots used and 5 total so far. I thought it would be a good idea to start pots full of things that I will use together at the same time. Sort of like a meal plan done way in advance. We'll see how that works out in a couple months.

Have you planted garlic before? It's pretty easy:
The oregano seedlings aren't doing so well, but they did sprout! I'm a bit disappointed but at least they did make a showing. On the other hand, a couple of the garlic cloves did sprout. I can't recall if I planted 5 or 6 cloves, but so far 2 did come up, 1 much faster than the other. Here's the update link 11 days after planting along with pictures of the progress.
Have you planted garlic before? It's pretty easy:
Progress Today
Today I started with plants on the still-not-done indoor plant shelves. So far I've planted Kohlrabi, Romaine Lettuce and Beans (Pinto Beans). I was just planning on testing my latest PVC pipe watering idea with the Kohlrabi seeds, but didn't want to have unused lighted space.

Here's the updates!
December 8th: Lettuce sprouted (3 days after planting)
- Lettuce seedlings with true leaves
- Kohlrabi sprouts (update photos are not encouraging)
- The pinto beans have great leaves & height already!
Kohlrabi test fun
Inside the pot are kohlrabi seeds. In the center is a sawed off pvc pipe section so I can get water to the roots without inviting bugs to wet dirt on top by the future seedlings. I had learned last spring that I over-water and am hoping the pvc pipe watering idea will help me not over-water this time.


Well, here's what the seedlings look like 12 days later. Of about 20 seeds planted, only 3 came up at all. Not sure what I did wrong but we'll see if any of these 3 make it to be an adult plant or not.
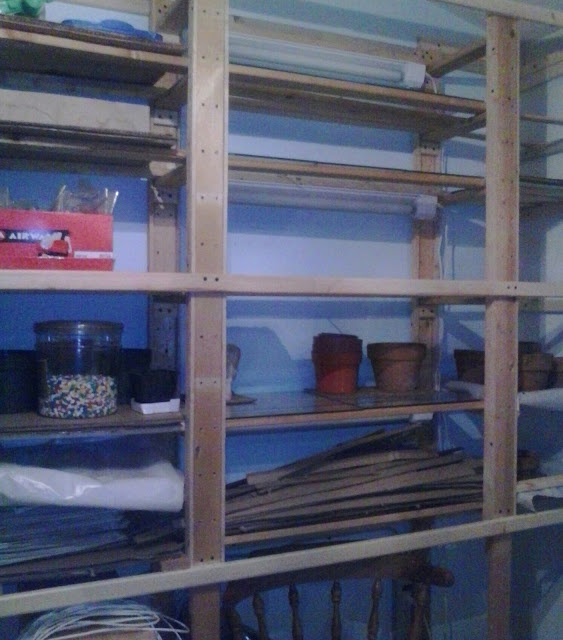
Indoor plant shelves - Project 2
First of all, I am still learning to post pictures and text with this new phone, so sorry if this post ends up looking wonky.
For a while now I've been dreaming of having indoor plant shelves setup for growing plants in the winter. It's still only fall of course, but time flies and it feels like winter will be here in a blink. The main problem I have had with figuring how to build shelves is that I'm stuck with only being able to get free building materials from craigslist.org. Sure I can design to my heart's content, but when I go to a supply store and see the prices for wood and glass plate shelves I am sad. So the project is taking a bit longer than I imagined.
Luckily by the time people are cleaning out their garages and sheds, they usually just want stuff gone - so it's free! I've made just a few trips around town and managed to get:
- glass shelf pieces (so lights can shine more on plants)
- wood scraps (so I'm not losing money when I cut wrong)
- cardboard and plastic sheets (for making waterproof pot trays)
- plenty of used pots and seedling sized containers
The three things I did have to buy were indoor grow lights, short screws, and the power strip for plugging in all the lights at once. Next time though I hope to remember to look at Goodwill for super cheap power strips.
Sharing the picture(s) to share how far the project has come so far, even though no plants are growing on the shelves yet. The red shoebox holds the seeds that will be in the pots to be on the shelves - and hopefully growing nicely this winter.
More Winter Planning
I'm happily working on plans for stepping up my indoor plants this winter, focusing on edibles of course. How to grow seeds indoors is a great intro if you'd like more than just hanging ferns and window sill flowers.
The two semi-protected planter boxes I've placed outside the front door of my house were the 1st two that I made the same size. Not just for looks, they're the boxes that I'd like to make cold frames for. I haven't yet, but this is a good idea of what they will look like. There are quite a lot of cold frame ideas on YouTube, also, but I'm hoping to find the cheapest & easiest way for myself.
The two semi-protected planter boxes I've placed outside the front door of my house were the 1st two that I made the same size. Not just for looks, they're the boxes that I'd like to make cold frames for. I haven't yet, but this is a good idea of what they will look like. There are quite a lot of cold frame ideas on YouTube, also, but I'm hoping to find the cheapest & easiest way for myself.
Subscribe to:
Posts (Atom)